A few months back, I had decided to rekindle my video game making dream and have a proper crack at it. But obviously, I’m held up with two major items – one is my job which I can’t do without right now, and another one is the online master’s course on Data Science. But I haven’t put my game making journey completely on hold. I’ve been making slow (very slow) progress on non-programming areas – namely music and art.
I’ve started to learn how to draw. That’s my weakest link. I have some experience making music from learning to play my Violin. I know programming. But I am at level zero in art. I’m amazed at how much resources there are available for learning how to draw online. And of great quality. I’ve specifically started to learn using the Drawabox lessons. They appeared absolutely suitable for a know-nothing like me.
Naturally, I wanted to use my Wacom Intuos tablet to learn drawing. Boy how completely different it is from drawing on paper! I installed Krita – beautiful software by the way. Since I had already started doing some exercises on Drawabox, I tried repeating the same exercises on the drawing tablet. I just couldn’t. I was able to draw basic shapes quite well on paper, but on the tablet, I couldn’t even draw a single line without wobbling. And I’m used to rotating the paper while writing or drawing – which was not very convenient in using the tablet.
But I think I’ve got the hang of it now. No, I still can’t draw very well, let alone on a drawing tablet. But I’ve got some learning to put me on the right direction. What I’ve learned about drawing tablets so far –
Put it on the Side
We usually rotate the paper and write/draw at an angle because the arm is attached to the side, while the paper is in the centre in front of us. If the paper is also moved to the side, I realise that it’s no longer inconvenient to keep the paper fixed. Extending that, I just put the drawing tablet on the side – where I usually have the mouse. Instantly, my hand-eye co-ordination shot up and I felt so much more comfortable drawing without having to rotate the tablet. My lines were mostly aligned in the direction I want to.
Reduce the Lag
I noticed that there was an annoying lag while drawing with the tablet. Now unless I get myself a super high-end tablet, I probably can’t get rid of this problem. But I was able to reduce it a lot. I connected the tablet using USB rather than Bluetooth. It was a bit less convenient – but shouldn’t matter if you don’t have to constantly move the tablet as you’re drawing. I also quit other applications running in my computer. It’s a great improvement even if the lag reduces by a fraction.
Mind the Aspect Ratio
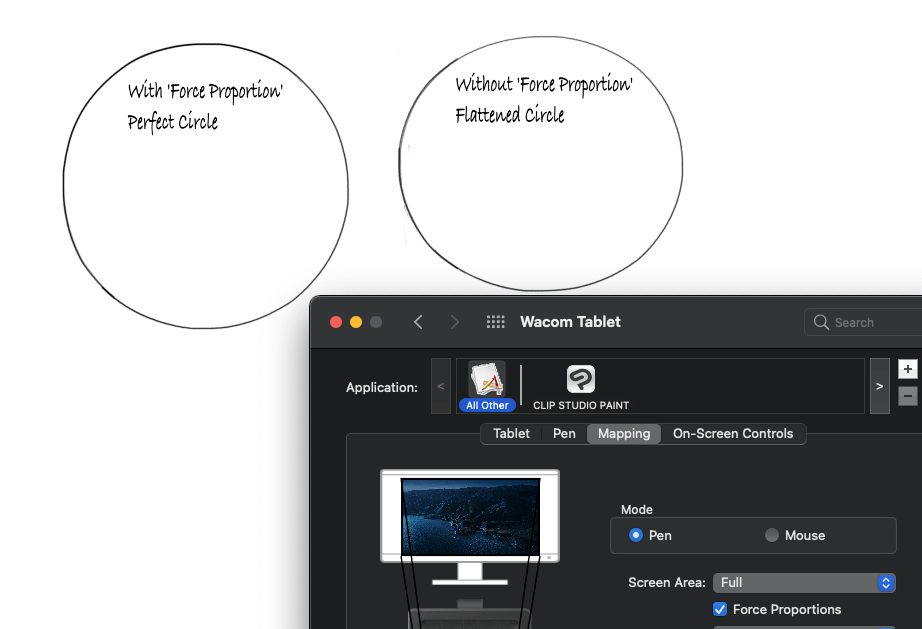
The drawing tablet and the monitor might have different aspect ratios. Mine did. It took me quite some time to notice this. I’m not very experience but I suppose this is a bad thing. It’s better not to get used to this kind of anomalies. To check, I put a perfectly round bottle cap on the tablet and drew a circle. It came out noticeably flat. But there was a setting in the tablet configuration (On Mac: Settings > Wacom Tablet > Mapping > Force Proportion), which made this right. After this setting, I repeated the bottle cap drawing and it came out perfectly circular.
Practice!
Practicing a few minutes everyday improved my ease of using the tablet. While this is obvious, I just want to say that two exercises helped more than others.
- Superimpose lines – This was the first drawabox exercise, and it was especially useful on the tablet. Just draw a smooth line and try to draw several lines over that same line. Try to get it deviating as little as possible. This helps improve sense of direction while drawing in one place (on the tablet) and observing it elsewhere (on the monitor).
- Tracing – Open some line drawing as a layer in your drawing software, reduce opacity of that layer. Now with the pen, trace the drawing. This is a fun exercise too. Just be mindful of whether you’re drawing from your wrist or elbow or shoulder.
But not too Much!
Don’t ‘grind’. This is an advice I get a lot ever since I started to learn drawing, and I’ve come to completely agree with it. If you’re trying something, reach a ‘decent’ level and then move on. Don’t try to keep practicing the same thing till you get it perfectly. That’s for when you know what you want to draw. When learning, be content that you practiced. And move on. You don’t have to draw a perfect straight line – you just have to draw a ‘confident’ straight line. It improves as you keep drawing. If you repeat the same exercise to death, then it just becomes demotivating and tiresome.
Learn the Software
Remember that you just need to become confident and comfortable using the tablet. Not things like drawing a perfect straight line, being able to draw in any direction etc. Learn the standard features of the software. For example, most drawing software have a stabilisation feature that adjusts any wobbles. They make ellipses neat once you’ve drawn them. Although as a learner, it’s good to learn the basic art instead of relying on these features, it’s still good to learn the features. Because you’ll know what techniques to concentrate on in the beginning, and what techniques will be irrelevant because of software assistance.
So there it is. My (very premature) tips on learning to draw using a tablet – for beginners. If you’re a total beginner like me, first you need to learn ‘how to see’ – recognise the shapes in what you want to draw. The pen, or paper, or your graphics tablet – are just tools after that. So the most important tip – think and understand what your instructor (or ur tutorial website) says. No matter how much you stumble, you will eventually (and quite soon), become comfortable using your tools.